Stockouts cost retailers a staggering $82 billion every year. Moreover, poor inventory management leads to unsold products and lost revenue. Consequently, running an online store requires more than just listing products. In fact, effective inventory management separates successful stores from failing ones. Therefore, understanding how to manage inventory Shopify becomes crucial for your business growth. Additionally, proper stock tracking prevents customer disappointment and maximizes profits.
This comprehensive guide walks you through Inventory Management on Shopify from start to finish. Furthermore, we’ll cover everything beginners need to know about Inventory Management on Shopify. Specifically, you’ll learn setup processes, daily operations, and optimization strategies. Meanwhile, we’ve designed this guide with simplicity in mind. As a result, you’ll build confidence managing your inventory system Shopify efficiently.
What is Inventory Management on Shopify?
Essentially, Inventory Management on Shopify tracks your product quantities across all sales channels. Similarly, it monitors stock levels and prevents overselling disasters. In the e-commerce context, it involves recording items entering or leaving your warehouse. Additionally, Shopify provides built-in tools automatically updating stock after sales. The system includes three key components: tracking, monitoring, and adjusting. Furthermore, understanding “On Hand,” “Available,” and “Committed” inventory prevents daily confusion. Therefore, mastering these basics ensures smooth operations.
Why Inventory Management Matters for Your Store?
Primarily, proper Shopify inventory tracking prevents stockouts and overselling disasters completely. As a result, customers receive orders on time consistently. Additionally, efficient warehouse management reduces unnecessary storage costs significantly. Furthermore, smart stock tracking improves overall cash flow substantially. Moreover, data-driven decisions replace guesswork in purchasing entirely. Similarly, when you build a website on Shopify, planning your inventory system from day one saves headaches later. Therefore, finding balance becomes essential for profitability.

Getting Started with Inventory Management on Shopify
Now that you understand the basics, let’s dive into the practical setup process. Follow these four essential steps to establish your inventory system correctly.
Step 1: Enable Inventory Tracking

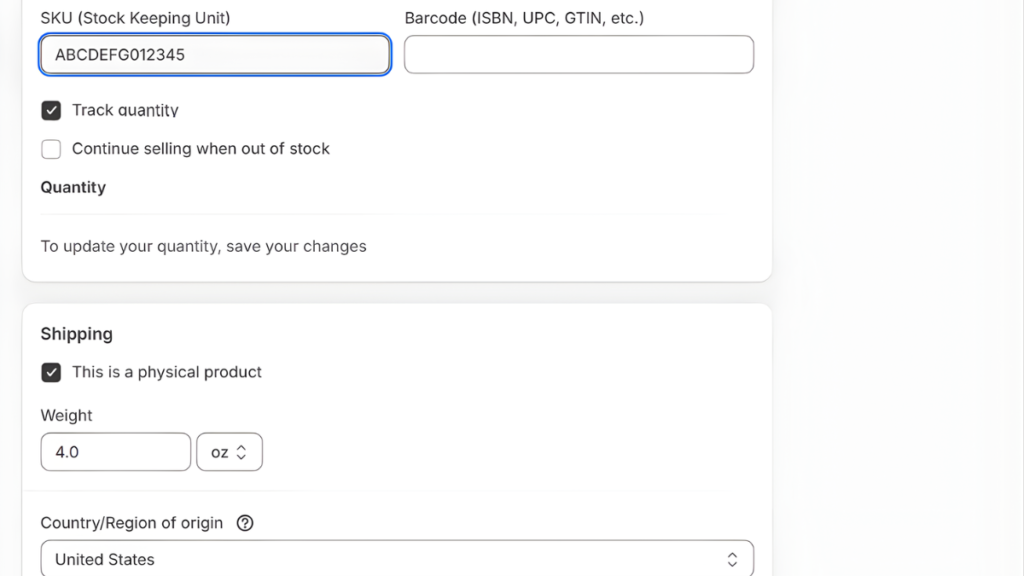
Initially, log into your Shopify admin panel. Then, navigate to Products from the left sidebar. Next, click on Inventory to access tracking options. Subsequently, select any product you want to track. Finally, check the “Track quantity” box under inventory settings.
However, not all products need tracking enabled. For instance, digital downloads don’t require stock monitoring. Similarly, services like consultations work without quantity limits. Therefore, evaluate each product type individually. Nevertheless, physical products always need tracking activated. Otherwise, you risk overselling and disappointing customers.
Step 2: Setting Up Your First Location

Meanwhile, Shopify uses “locations” to organize where you store products. Initially, every store gets one default location automatically. Typically, this represents your primary warehouse or storage space. However, naming it clearly helps avoid confusion later.
To set up properly, go to Settings, then Locations. Next, click on your default location. Then, add a descriptive name like “Main Warehouse” or “Home Storage.” Additionally, include the full address for shipping calculations. Consequently, accurate locations ensure correct shipping rates.
Furthermore, multiple locations become necessary as you grow. For example, you might add retail stores or additional warehouses. Similarly, dropshipping businesses often need multiple supplier locations. Therefore, plan ahead for future expansion needs. Check out the best apps for dropshipping.
Step 3: Adding Your Initial Inventory Quantities

Subsequently, you need to enter your starting stock numbers. First, navigate to Products, then Inventory in your admin. Then, find each product in the list. Next, click on the quantity field beside it. Finally, enter your current stock count.
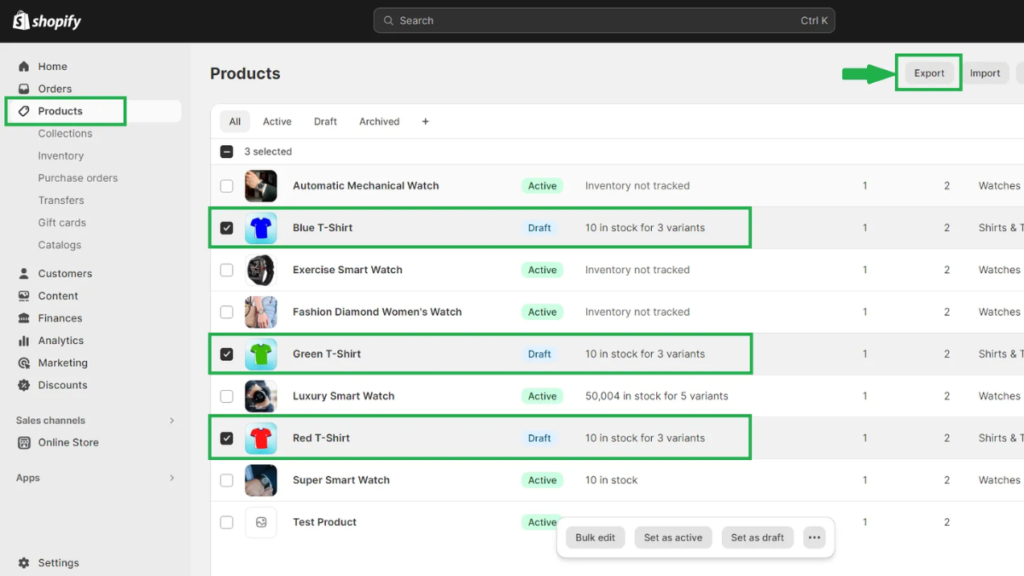
Alternatively, bulk uploads save time for large inventories. Specifically, use CSV file imports for hundreds of products. To do this, export your current product list first. Then, add quantities in the inventory column. Finally, import the updated CSV file back into Shopify.
Additionally, setting safety stock levels prevents emergencies. Essentially, safety stock acts as your buffer against unexpected demand. Therefore, always maintain extra units beyond your average sales. Moreover, this practice prevents stockouts during busy periods.
Step 4: Configuring Out-of-Stock Settings
Finally, decide what happens when products run out. Specifically, Shopify offers two main options. First, “Stop selling when out of stock” prevents overselling automatically. Consequently, the product becomes unavailable on your storefront. This option works best for physical products.
Conversely, “Continue selling when out of stock” allows backorders. Therefore, customers can purchase even without current stock. However, clearly communicate expected shipping delays to buyers. Otherwise, you’ll face complaints and possible refunds.
Moreover, setting up low stock alerts keeps you informed proactively. Specifically, Shopify sends notifications when quantities drop below thresholds. Therefore, you can reorder before running out completely. Additionally, combining this with your best payment provider for shopify ensures smooth transaction processing throughout.
Core Features of Inventory Management on Shopify
Once your setup is complete, understanding core features maximizes your efficiency. These built-in tools streamline daily inventory tasks effortlessly.
Inventory Tracking Dashboard
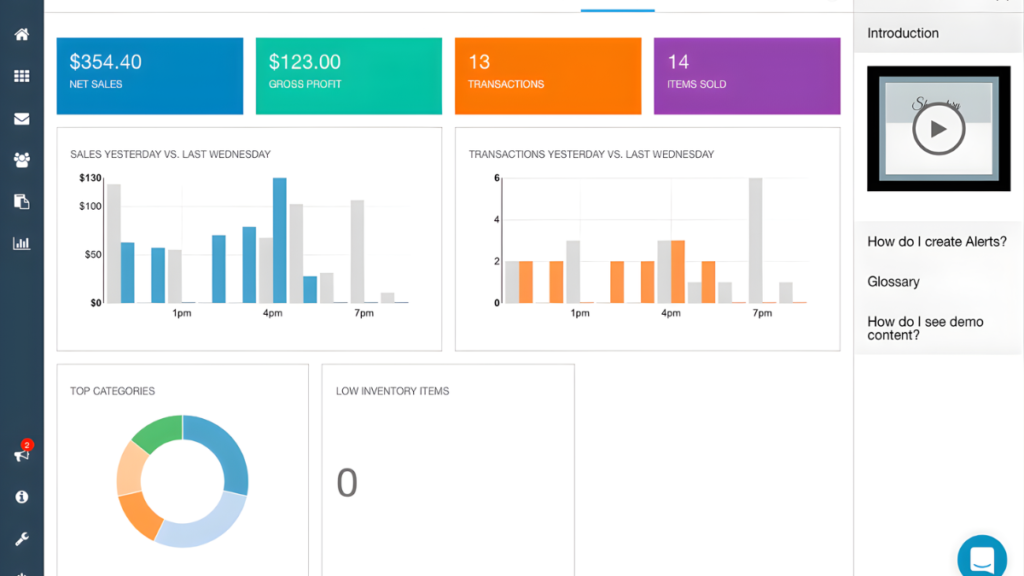
Your inventory dashboard centralizes all stock information in one place. Initially, access it through Products, then Inventory in the admin panel. Here, you’ll see every product with current quantities displayed. Additionally, filter options help you find specific items quickly.
Specifically, use the search bar to locate products by name or SKU. Furthermore, filters are sorted by availability status or location. For instance, view only low-stock items needing immediate attention. Similarly, check products at specific warehouse locations separately. Therefore, organizing your view saves considerable time daily.
Moreover, creating custom views streamlines your workflow significantly. Essentially, save frequently used filter combinations for quick access. Consequently, you can monitor critical inventory aspects instantly.
Product Variants Management
Meanwhile, many products come in different sizes, colors, or styles. Therefore, tracking each variant separately becomes essential. Fortunately, Inventory Management on Shopify handles variants effortlessly. Specifically, each variant gets its own quantity field and tracking.
Additionally, SKU assignment helps identify variants uniquely. For example, use codes like “TSHIRT-RED-M” for red medium t-shirts. Similarly, systematic naming prevents confusion during order fulfillment. Furthermore, barcode integration speeds up warehouse operations dramatically.
Moreover, organizing similar products together improves efficiency. Specifically, group variants under parent products logically. Therefore, finding related items becomes much faster during restocking.
Real-Time Inventory Updates
Furthermore, Shopify automatically adjusts quantities after each sale. Consequently, your inventory system stays accurate without manual intervention. Similarly, when customers complete purchases, stock decreases immediately. Therefore, real-time updates prevent overselling across all channels.
Additionally, returns and refunds affect inventory automatically too. Specifically, returned items add back to available stock. However, you can override this for damaged returns. Moreover, syncing works across your online store, POS systems, and marketplaces. Thus, selling through multiple channels remains seamless and accurate.
Managing Multiple Locations
As your business grows, multiple storage locations become necessary. Advanced Inventory Management on Shopify includes multi-location support for expanding businesses. For instance, you might open physical retail stores alongside your online shop. Similarly, additional warehouses in different regions reduce shipping times. Furthermore, shopify print-on-demand stores often work with multiple supplier locations simultaneously.
To add locations, navigate to Settings, then Locations in your admin. Next, click “Add location” and enter the details. Subsequently, assign products to specific locations individually. Therefore, each location maintains separate inventory quantities.
Moreover, tracking inventory separately per location prevents stock confusion. Specifically, you’ll know exactly which warehouse holds what products. Additionally, transfer management lets you move stock between locations easily. For example, ship products from one warehouse to another when needed.
Furthermore, fulfillment priority settings determine which location ships orders first. Typically, choose the location closest to your customer. Consequently, shipping costs decrease while delivery speed increases. Therefore, strategic location management improves customer satisfaction significantly.
Day-to-Day Inventory Operations
Managing your inventory system requires consistent daily attention and maintenance. These routine operations keep your stock data accurate and reliable.
Making Inventory Adjustments
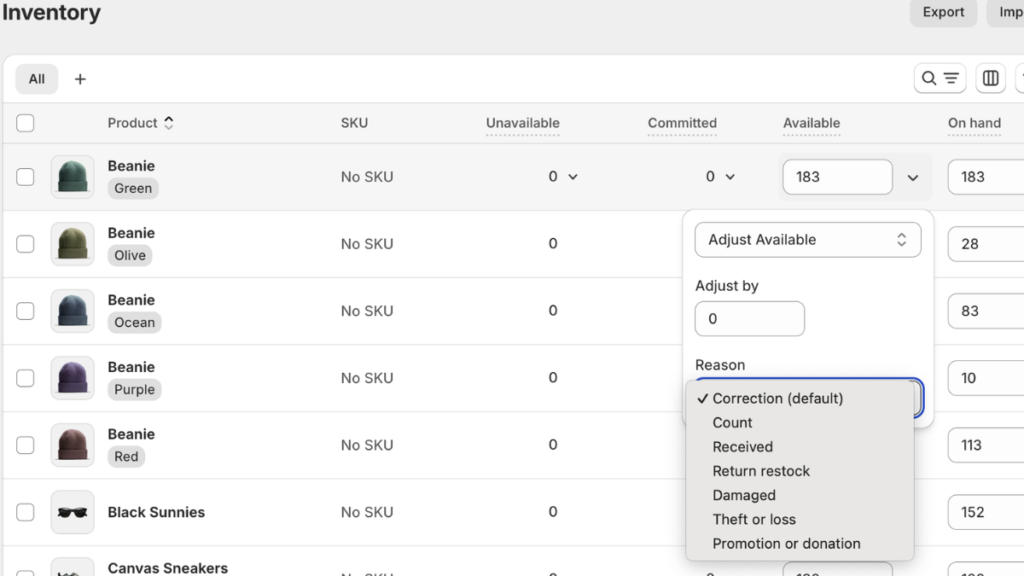
Inevitably, you’ll need to adjust quantities manually sometimes. For instance, damaged products require removing from available stock. Similarly, found items during stocktakes need adding back. Therefore, understanding adjustment procedures becomes essential for accurate stock tracking.
To adjust quantities, go to Products, then Inventory. Next, click on the quantity you want to change. Then, select “Adjust” and enter the new number. Additionally, always record reasons for adjustments in the notes field. For example, note “damaged in shipping” or “found during count.”
Furthermore, bulk editing saves time when adjusting multiple products simultaneously. Specifically, select several items using checkboxes. Then, choose “Edit products” and modify quantities together. Moreover, the adjustment history feature tracks all changes automatically. Therefore, you can review who made changes and when.
Purchase Orders and Restocking
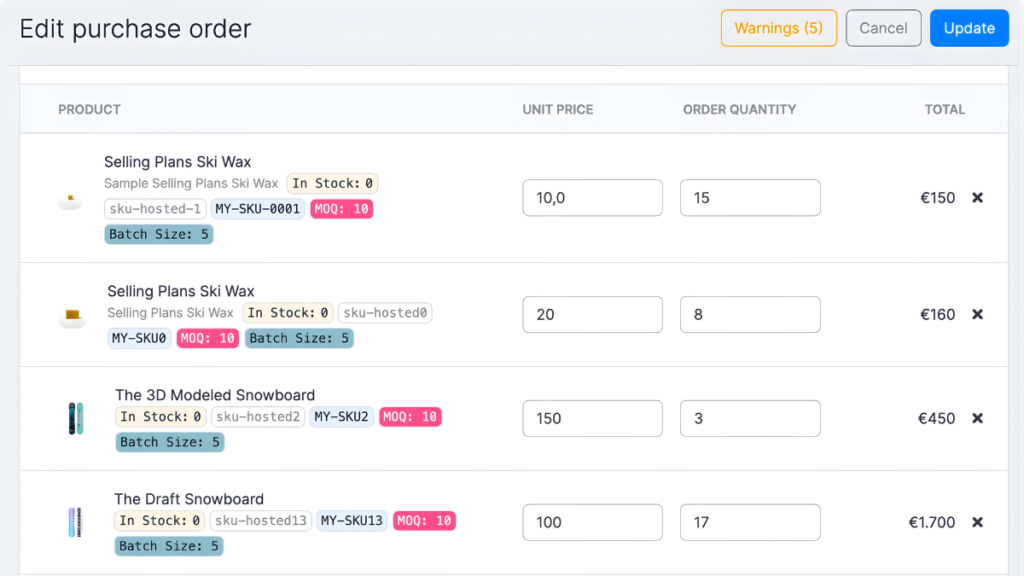
Meanwhile, creating purchase orders streamlines your supplier relationships significantly. First, navigate to Products, then Transfers in your admin panel. Next, click “Create transfer” to start a new order. Then, select your supplier and add products needed.
Subsequently, enter expected quantities and delivery dates clearly. Additionally, send the purchase order directly to suppliers electronically. Thus, communication remains documented and organized. Moreover, when shipments arrive, receive inventory through the system properly.
Furthermore, managing incoming inventory updates your stock automatically. Specifically, mark items as “received” once they arrive physically. Consequently, available quantities increase immediately in your inventory system Shopify. Additionally, setting reorder points automates future ordering decisions. Therefore, you’ll know exactly when to restock products.
Conducting Inventory Counts (Stocktakes)
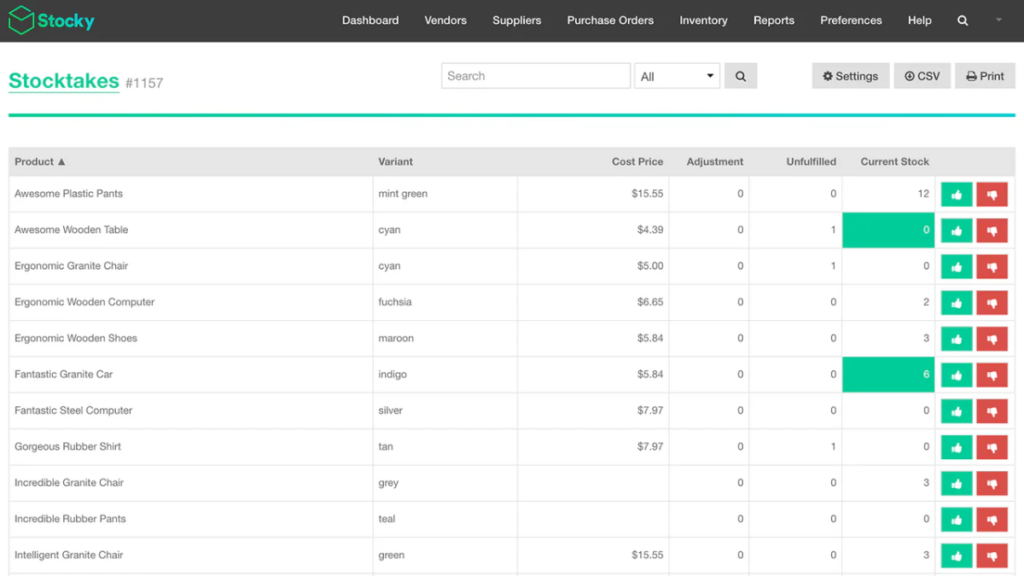
Regular stock counts ensure your system matches physical inventory accurately. Effective Inventory Management on Shopify requires quarterly full counts for best results. However, high-value items need more frequent verification. Therefore, schedule counts during slower business periods.
To conduct counts effectively, print current inventory reports first. Then, physically count each item in your warehouse systematically. Next, record actual quantities on your printed list. Finally, compare counted numbers against system quantities carefully.
Moreover, best practices include organizing products logically beforehand. Additionally, count items twice to prevent errors. Furthermore, involve two people for accuracy on expensive products. Subsequently, reconcile differences by adjusting quantities in Shopify. Therefore, your digital records match reality precisely after counting.
Inventory Reports and Analytics
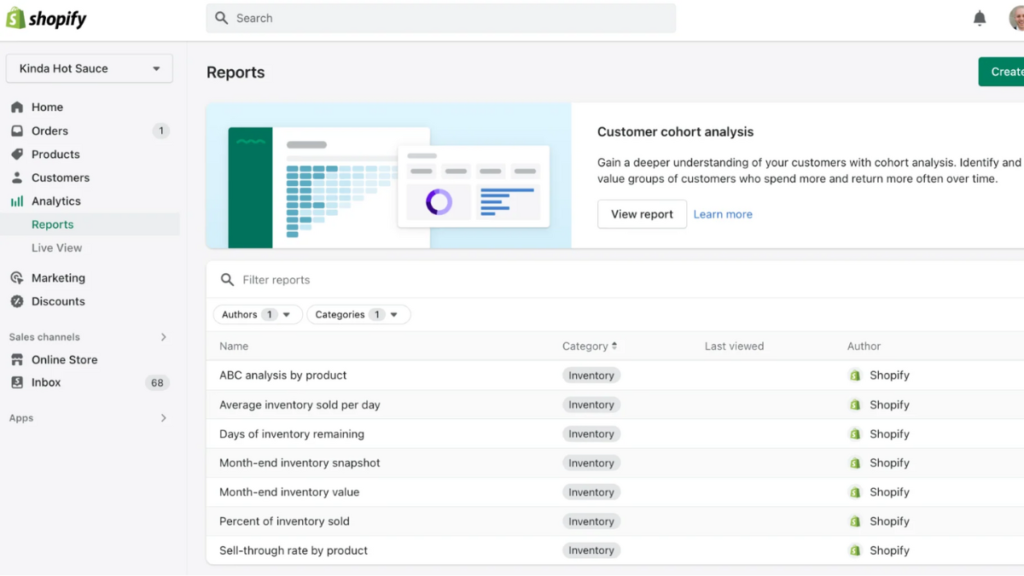
Understanding your inventory performance requires analyzing key metrics regularly. Successful Inventory Management on Shopify starts with proper analytics and reporting. First, access reports through Analytics in your Shopify admin. Then, navigate to the Reports section specifically. Here, you’ll find various inventory-related reports available. Similar to how you speed up shopify website, monitoring inventory metrics improves overall store performance.
Furthermore, “days of inventory remaining” forecasts when products will run out. Consequently, you can reorder proactively before stockouts occur. Moreover, ABC analysis categorizes products by value and sales volume. Therefore, focus attention on high-value items first.
Finally, using data for purchasing decisions beats guesswork consistently. Specifically, order products based on actual sales patterns. Additionally, forecasting future needs prevents both overstocking and understocking. Thus, smart analytics directly improves profitability and efficiency.
Essential Shopify Inventory Apps and Tools
While built-in features work well, additional apps enhance Inventory Management on Shopify functionality significantly. First, Shopify Flow automates repetitive tasks like low stock alerts. Consequently, you receive notifications automatically when quantities drop below thresholds. Therefore, manual monitoring becomes unnecessary for most products.
Additionally, popular inventory management apps from the App Store offer advanced features. For instance, some apps provide detailed forecasting and analytics. Similarly, others integrate with multiple sales channels seamlessly. Meanwhile, barcode scanner apps speed up physical counting dramatically.
Furthermore, third-party solutions become necessary as businesses scale larger. Specifically, complex warehouse management needs specialized software integration. Moreover, accounting software connections ensure financial records stay synchronized. Just like selecting the best SEO app for Shopify improves visibility, choosing proper inventory tools streamlines operations significantly.
Common Inventory Management Mistakes to Avoid
Unfortunately, beginners often make preventable inventory mistakes. Learning proper Inventory Management on Shopify helps avoid these common pitfalls. First, not enabling tracking from the start creates major problems later. Therefore, activate Shopify inventory tracking immediately when adding products. Otherwise, you’ll face overselling disasters quickly.
Additionally, ignoring inventory forecasting leads to frequent stockouts or overstock situations. Consequently, review sales patterns regularly and plan ahead. Similarly, poor organization and labeling cause fulfillment errors frequently. Therefore, maintain systematic naming conventions from day one.
Finally, overcomplicating your inventory system initially overwhelms beginners unnecessarily. Therefore, start simple and add complexity gradually. Additionally, failing to account for seasonal variations causes cash flow problems. Thus, plan for busy seasons well in advance.
Best Practices for Beginners
Successfully managing Inventory Management on Shopify requires following proven best practices consistently. First, start simple and scale your system gradually as needed. Consequently, you avoid overwhelming complexity early on. Additionally, establish consistent naming conventions for all products immediately. Therefore, finding items becomes effortless during daily operations.
Furthermore, schedule regular inventory reviews weekly or monthly. Specifically, check reports and adjust strategies accordingly. Moreover, keep detailed records of all adjustments permanently. Thus, you can identify patterns and prevent future discrepancies.
Finally, plan for growth by choosing scalable systems early. Moreover, maintain strong supplier relationships for reliable restocking. Consequently, your business can expand smoothly without inventory bottlenecks. Just as you’d manage shopify bandoned checkout proactively, handle inventory systematically for success.
Advanced Tips for Growing Stores
As your store expands, implementing demand forecasting becomes increasingly valuable. Specifically, predictive analytics help anticipate future inventory needs accurately. Therefore, you reduce both stockouts and overstock situations simultaneously. Additionally, setting up automatic reorder points triggers purchase orders without manual intervention.
Furthermore, using Shopify POS for retail integration creates seamless inventory syncing. Mastering Inventory Management on Shopify becomes easier with POS integration. Consequently, online and offline sales update the same inventory pool. Moreover, managing bundles and kits requires careful tracking of component products. Therefore, ensure individual items update correctly when bundles sell.
Additionally, handling pre-orders effectively prevents overselling future stock commitments. Specifically, track pre-orders separately from available inventory quantities. Similarly, multi-channel inventory syncing keeps marketplaces updated automatically. Thus, selling on Amazon, eBay, and your store works harmoniously. Like choosing the best email marketing app for shopify, advanced inventory tools scale with growth.
Conclusion
Mastering Inventory Management on Shopify transforms your online business fundamentally. Throughout this guide, we’ve covered essential concepts from basic setup to advanced optimization. Moreover, you now understand tracking, locations, adjustments, and reporting comprehensively. Therefore, implementing these strategies will prevent costly mistakes significantly.
Remember, starting with basics and building up gradually works best for beginners. Additionally, regular monitoring and adjustments keep your inventory system running smoothly. Furthermore, automation tools reduce manual work while improving accuracy consistently. Consequently, you’ll save time and money while increasing customer satisfaction simultaneously.
Ready to transform your store with powerful Inventory Management on Shopify features? Start your Shopify journey today and build a profitable business with confidence. Moreover, proper inventory management ensures your store scales successfully while maintaining excellent customer experiences throughout.
