Imagine you’re scrolling through social media, spotting a stunning photo that stops you in your tracks. The colors pop, the background fades perfectly, and it looks professional, yet the creator was just a beginner like you. That’s the magic of Corel Editor, a powerful photo editing software that turns novices into confident creators without the overwhelm.
Picture this: You open your first image, a family snapshot or product photo for your online store. With its user-friendly interface, you effortlessly crop and resize images, adjust photo brightness, and even remove the background from a photo using smart AI tools. No steep learning curve like other image editing software, just intuitive layer-based editing, batch processing, and effects that make your visuals shine.
In this beginner’s guide to Corel Image Editor, discover its standout features, master the simple interface, and unlock essential tips for digital photo editing. Whether for social media graphics, e-commerce shots, or personal projects, Corel Editor empowers you to create pro-level results fast. Ready to edit like a pro? Let’s dive in!
What Makes Corel Image Editor Stand Out Among Photo Editing Software?
In the competitive image editing world, Corel Image Editor excels through user-focused design. Unlike flashy beginner photo editors with basic features, it blends professional power with true accessibility. The one-time purchase model beats draining subscriptions, offering lifetime access and updates that encourage deep mastery.
Optimized for multi-core processors and GPU acceleration, it handles 50MP RAW files smoothly on systems with 8GB RAM. Brush strokes are 4x faster than those of free alternatives. Hybrid raster-vector tools enable seamless photo retouching, shapes, and scalable text for diverse projects.
Full PSD compatibility, HEIC conversion, and WebP export eliminate format frustrations, making Corel Editor the versatile choice for beginners tackling client work and creative projects confidently.
Core Features of Corel Image Editor: From Essential Tools to Creative Powerhouses
Corel Image Editor packs comprehensive functionality that rivals professional suites while maintaining beginner accessibility. Rather than overwhelming users with hundreds of scattered tools, it organizes features into intuitive workflows that guide you from basic corrections to artistic masterpieces.
Basic Editing Tools

Every successful edit begins with fundamental adjustments, and Corel Image Editor excels at making these operations both powerful and approachable. The crop tool goes far beyond simple trimming, offering perspective correction that automatically straightens crooked horizons using edge detection algorithms. Golden ratio and rule-of-thirds overlays help compose professional-looking images instinctively, while content-aware cropping intelligently extends canvas areas to remove distracting edges.
Resizing maintains pristine quality through intelligent resampling methods tailored to your output needs. Bicubic interpolation preserves photo details for print, while Lanczos sharpening optimizes web graphics. The software even suggests optimal dimensions based on your selected destination – 1080×1080 for Instagram squares, 1200×630 for Facebook posts, or custom print sizes with proper 300 DPI resolution.
Color correction employs industry-standard controls familiar to professionals but explained for beginners. The histogram reveals overexposed highlights and crushed shadows, guiding precise adjustments. White balance eyedropper sampling neutralizes color casts from mixed lighting conditions, while vibrance sliders enhance muted colors selectively without oversaturating natural skin tones. Auto-enhance analyzes exposure, contrast, clarity, and saturation simultaneously, providing intelligent starting points that save hours of manual tweaking.
Layer Editing and Masks
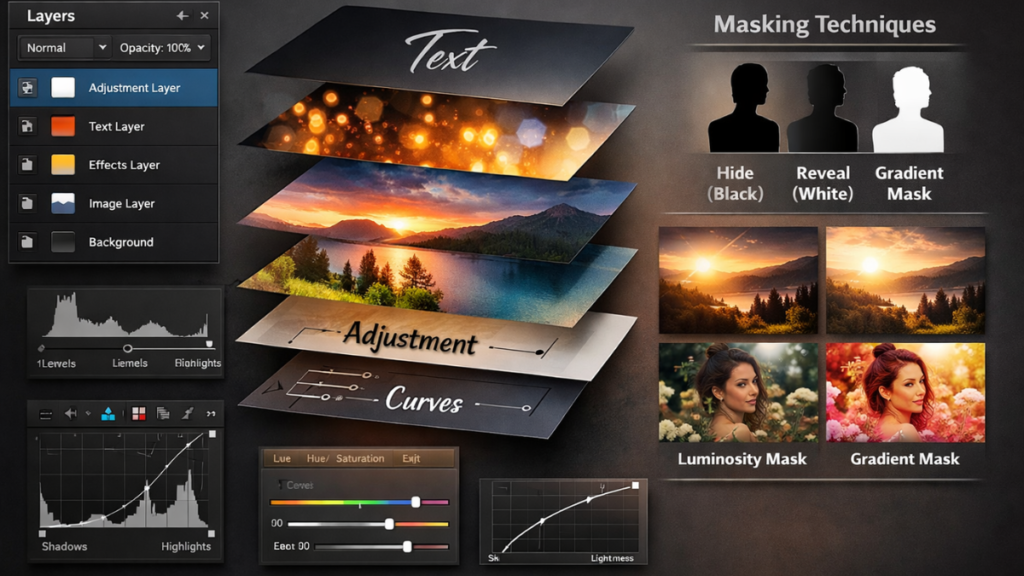
Layer editing represents where Corel Image Editor transforms from a simple editor to a professional powerhouse. Imagine stacking transparent sheets of glass – each layer maintains complete independence, allowing unlimited combinations of images, adjustments, text, and effects. Blend modes like Multiply deepen shadows realistically, Overlay enhances texture naturally, and Screen brightens highlights selectively.
Layer groups organize complex compositions logically, collapsing related adjustments into single clickable units. Layer comps save multiple layout variations instantly, perfect for client approvals or A/B testing social media graphics. This non-destructive approach means every experiment remains reversible, building confidence in creative risk-taking.
Masks provide surgical precision rivaling dedicated compositing software. Painting with black conceals areas completely, white reveals fully, and grays create smooth transitions. Gradient masks craft elegant vignettes or selective color grading, while luminosity masks target specific tonal ranges automatically – brightening shadows without affecting highlights, for example.
Adjustment layers apply corrections to all layers above them non-destructively. Levels provide shadow/midtone/highlight control through intuitive sliders or precise numerical input. Curves create dramatic contrast via S-shaped adjustments, while Hue/Saturation layers enable color shifting without affecting brightness values. These tools combine to form the backbone of professional color grading workflows.
Advanced Photo Retouching
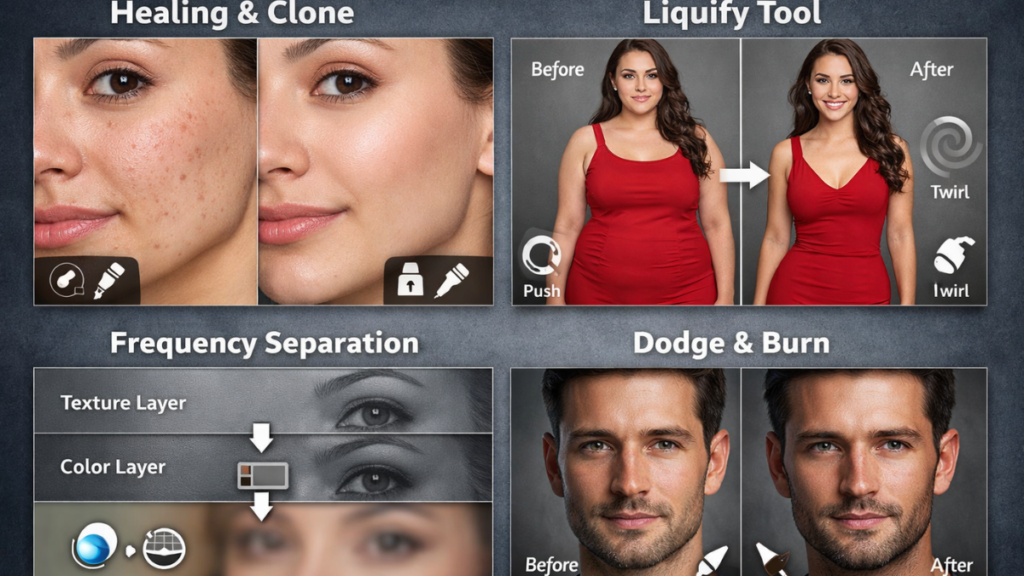
Photo retouching tools demonstrate Corel Image Editor’s professional heritage. The Healing Brush analyzes surrounding pixels to fill blemishes seamlessly, making acne, wrinkles, and dust spots vanish naturally. Clone Stamp offers pixel-precise control for removing larger distractions like telephone wires, logos, or unwanted background elements from group portraits.
Liquify reshapes features with surgical accuracy – subtly slimming waistlines, enhancing smiles, reshaping uneven facial contours, or correcting distorted horizons from wide-angle lenses. The Forward Warp tool pushes pixels gently, while the Twirl creates natural, organic movement for hair or fabric textures.
The Frequency Separation technique splits skin into separate texture and color layers, enabling Hollywood-level smoothing without the plastic “airbrushed” look. Blur one duplicate layer to isolate smooth color areas, apply High Pass filter to the other for crisp texture details, then blend strategically. This professional workflow becomes intuitive after just a few practice sessions.
Dodge and Burn tools selectively lighten or darken specific areas using dedicated overlay modes that prevent color shifts. Content-Aware Fill removes complex objects by intelligently reconstructing backgrounds from surrounding patterns, and if you’re looking for dedicated solutions, check out the best free background remover tools available that often require zero manual cleanup for simple tasks.
Vector Graphics Basics
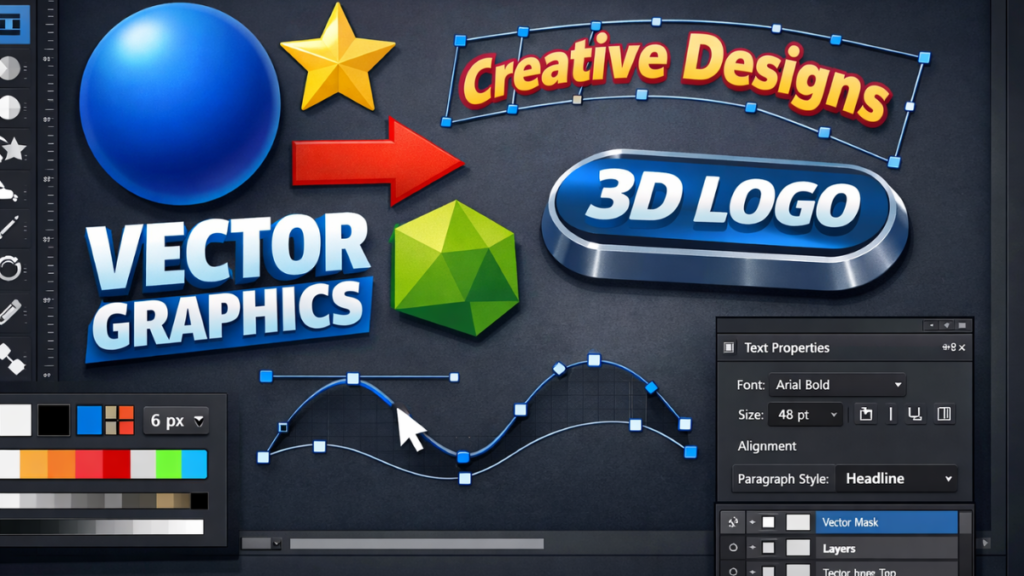
While excelling at raster editing, Corel Image Editor incorporates essential vector capabilities for complete creative freedom. The Perfect Shapes tool draws flawless circles, stars, arrows, and polygons with customizable stroke weights and fill patterns, including gradients and patterns.
The advanced text engine supports paragraph styles for consistent formatting across projects, Envelope warping for curved headlines that follow organic paths, and 3D extrusion effects for creating professional button graphics and logos. Path tools enable custom bezier curves convertible to pixel-perfect selections or vector masks, bridging raster and vector workflows seamlessly, which is particularly useful when working with freepik mockup designs.
Filters and Effects
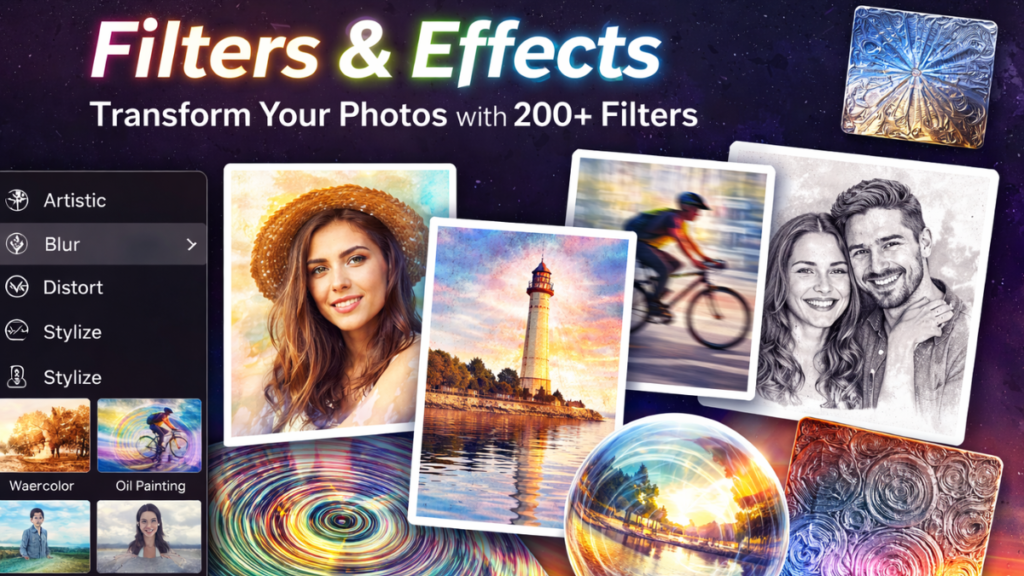
The effects gallery contains over 200 filters organized intuitively by category. Artistic filters transform photos into watercolor paintings, oil studies, or pencil sketches with realistic brush strokes. Blur effects range from soft Gaussian diffusion to directional Motion Blur simulating camera movement.
Distort filters create surreal transformations – Ripple effects for water reflections, Polar Coordinates for kaleidoscope visions, or Spherize for 3D orb effects. Stylize filters extract edges for graphic novel looks or apply Emboss for metallic textures.
Live filter previews update instantly as you adjust parameters, eliminating guesswork. Smart filters apply non-destructively via adjustment layers, while custom filter chains save complex effect combinations as reusable one-click presets for consistent artistic styling across projects, and you can even create an image with ai as a starting point before applying these effects.
Understanding the Corel Image Editor Interface
Mastering Corel Image Editor’s interface unlocks workflow efficiency that transforms editing from chore to joy. Rather than mimicking confusing industry standards, the interface adopts logical conventions enhanced by smart innovations that anticipate beginner needs.
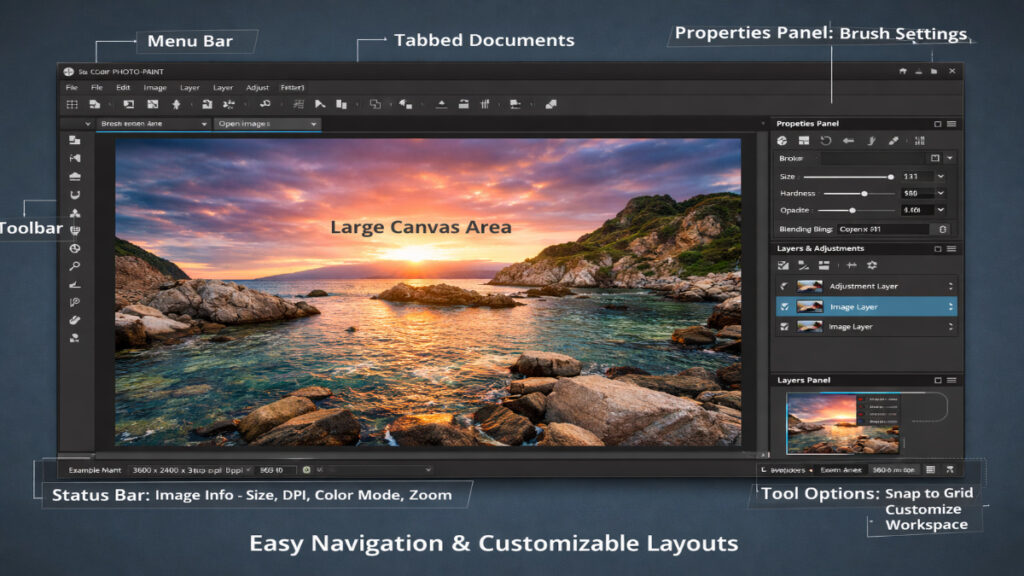
Main Layout Breakdown
The interface centers around a spacious canvas area supporting tabbed documents for seamless multi-image workflows. Rulers along the top and left edges provide measurement reference, while customizable guides assist precise alignment.
The top menu bar organizes functions logically: File handles import/export/save operations; Edit manages undo/redo and selections; Image contains adjustments and transformations; Layer controls stacking and masking; Filter applies effects; Window manages panels and arrangements; Help launches contextual tutorials.
A primary toolbar runs vertically along the left, featuring large, recognizable icons for essential tools: Selection marquee for rectangular/elliptical areas, Crop for composition control, Brush for painting and masking, Eraser for precise removal, Healing Brush for blemish correction, Clone Stamp for object removal, Text tool for typography, and Shape tools for vector graphics.
The right-side Properties panel adapts contextually to your active tool. Select the Brush, and it reveals Size, Hardness, Opacity, Flow, and blending mode controls. Switch to Layers, and it displays opacity, blend mode, and mask thumbnails. This dynamic interface prevents menu diving while providing professional-level customization.
Bottom status bar delivers critical information at a glance: current image dimensions, resolution (72 DPI web vs 300 DPI print), color mode (RGB/sRGB for screens, CMYK for print), zoom percentage, memory usage, and cursor coordinates for precise placement.
Customizing the UI Design
Corel Image Editor encourages personalization to match your workflow. Drag any panel by its title bar to dock it against screen edges or float it freely. Create multiple tab groups for related functions – keeping Layers and Channels together, Properties and History paired.
Workspace presets accelerate setup: “Photo Retouching” expands healing tools while minimizing vector options; “Graphics Design” prioritizes shapes and text; “Custom” saves your perfect arrangement. Access via Window > Workspace menu, with the Reset option restoring factory defaults instantly.
Interface themes toggle between dark mode for eye comfort during long sessions and light mode for presentations. Tooltips appear on hover, explaining every control, with an option to display extended help linking to video tutorials. Keyboard shortcut customization allows remapping to match muscle memory from other software, and if you’re exploring alternatives, you might want to compare this with best free ai photo editor options available.
Snap-to-grid and pixel-perfect alignment ensure crisp edges. Magnetically attract objects to the document center, page guides, or other objects using View > Snap To settings. These refinements transform chaotic editing sessions into organized, predictable workflows.
Navigation Essentials
Efficient navigation separates casual users from editing professionals. Zoom fluidly using Ctrl + mouse wheel for smooth 10% increments, Ctrl + 0 to fit the entire image on screen, or Ctrl + 1 for a 100% pixel-accurate view. The Navigator panel provides a thumbnail overview with click-to-jump positioning and a percentage readout.
Pan across large images using Spacebar + drag or dedicated Hand tool (H key). Middle-mouse button pans instantly regardless of the active tool. Full-screen mode (F11) hides all panels for distraction-free focus on complex retouching.
Selection management streamlines workflow: Ctrl + D deselects completely, Ctrl + Shift + D restores the previous selection, and Ctrl + click on a layer thumbnail loads its contents as a selection for precise masking. Transform handles appear proportionally with the Shift constraint, rotating around pivot points you define.
Multiple document handling shines for comparisons: Ctrl + Tab cycles open images, Window > Arrange > Tile displays side-by-side, Window > New Window creates identical dual views for before/after assessment. This comprehensive navigation system eliminates interface friction, letting creativity flow uninterrupted.
Corel Image Editor Pricing Plans
Corel Image Editor offers flexible pricing without requiring subscriptions.
| Plan | Price | Highlights | Ideal For |
| Starter Plan | $55–$72 | Layers, AI tools, RAW | Beginners |
| Ultimate Plan | $90 | +AfterShot, Screen Capture | Pros |
| Photo Video Bundle | $124.53 | +VideoStudio | Multimedia |
Free 15-day trial included. Own forever with updates.
Essential Tips for Corel Image Editor Beginners
These five battle-tested techniques separate casual users from confident creators. Master them, and Corel Editor becomes your daily workflow powerhouse.
Tip 1: Master the Crop Tool for Professional Composition
The crop tool transforms weak photos into visual masterpieces by controlling what viewers see first. Launch it with the C key or the toolbar icon. Drag corners to frame your subject perfectly, watching a real-time preview update continuously.
Perfect aspect ratios: Hold Shift during crop for precise proportions 16:9 widescreen, 4:5 portrait mode, 1:1 Instagram square, 2:3 Facebook vertical. Straighten slider automatically levels crooked horizons using edge detection, no manual rotation needed.
Enable View > Crop Overlay > Rule of Thirds grid positioning key elements along intersection points creates dynamic tension. Golden Spiral overlay guides natural eye flow through portraits and landscapes. Content-Aware Crop intelligently extends canvas edges when you need more headroom, and if you need quality images to practice with, explore stock image websites for diverse photo options.
Real result: Crooked family beach photo becomes balanced professional portrait in 45 seconds.
Tip 2: Work with Layers Like a Professional Organizer
Never edit your background layer directly. Immediately Layer > Duplicate Layer (Ctrl+J) creating “Working Copy.” This preserves your original safe forever.
Professional layer organization system:
Right-click layer > Rename descriptively: “V1_Sky_Enhanced,” “Skin_Retouch,” “Text_Headline_Main.” Layer > New Group organizes related adjustments:
Color-code groups (right-click > Layer Properties > Color) for instant visual navigation. Ctrl+G groups selected layers. This system scales from simple fixes to 50-layer composites effortlessly.
Tip 3: Quick Color Fixes Using Professional Workflow
One-click starting point: Image > Auto Enhance analyzes exposure, contrast, saturation, and clarity simultaneously often achieving 80% perfection instantly.
Fine-tune with Levels (Ctrl+L): Drag Input sliders left/right reclaiming shadow/highlight detail using histogram guidance. Output sliders control pure black/white points. Auto button suggests optimal starting values.
Curves (Ctrl+M) for precision: Create a gentle S-curve, dragging the lower left up slightly (shadow lift), the upper right down slightly (highlight control), middle point up (midtone brightness). RGB individual channels fix color casts boost Reds in skin, Blues in skies, and if you’re working with unprocessed images, consider checking out specialized raw photo editors for optimal results.
Before/after proof: Window > Split Vertical displays real-time comparison, eliminating guesswork. Vibrance +12-18 enhances muted colors naturally without oversaturated skin.
Tip 4: Retouch Portraits Using Hollywood Frequency Separation
Five-minute flawless skin technique:
- Duplicate background twice (Ctrl+J x2)
- Top layer: Filter > Other > High Pass (Radius 3-5px) > Blend Mode: Overlay (preserves texture)
- Middle layer: Filter > Blur > Gaussian Blur (Radius 6-10px) smooths color only
- Retouch color imperfections on the middle layer (Healing Brush)
- Fix texture issues on the top layer (Spot Healing, Clone Stamp)
Blemish removal: Lasso tool circles spots > Spot Healing Brush samples nearby clean skin seamlessly. Liquify (Shift+Ctrl+X) gently reshapes Forward Warp for contours, Pucker for pores.
Dodge/Burn finishing: New layer > Overlay mode > Dodge (lighten eyes/cheekbones 8-12%), Burn (define jawline/lips 5-8%). Skin glows naturally without a plastic “airbrushed” look.
Tip 5: Batch Processing: Edit 500 Photos While You Sleep
File > Batch Process eliminates repetitive work. Wedding photographers load entire ceremony folders:
Complete pipeline:
- Auto Enhance (exposure/color)
- Crop 4:3 (print albums)
- White Balance (eyedropper bride’s dress)
- Vibrance +15
- JPEG 90% to /Edited/ folder
500 images complete in 38 minutes vs 12 hours manually. Add watermark: Text layer “© YourStudio 2025”, bottom-right 2% opacity applies to entire batch.
E-commerce power: Process 2000+ product photos overnight standardize white backgrounds, resize 1000×1000, add pricing overlays before morning inventory upload.
Final Thoughts
Corel Image Editor is a powerful yet simple photo editor for beginners and professionals alike. It offers a user-friendly interface, making it easy to crop and resize images, adjust photo brightness, and remove the background from photo with just a few clicks. With features like layer-based editing, AI-powered tools, and batch processing, it’s perfect for digital photo editing tasks such as e-commerce product images or social media posts.
The software is affordable, with a one-time purchase and free trial download, so you can try before you buy. Corel Editor works well on Windows and is great for anyone looking for image editing software that is both powerful and easy to use. Whether you’re a hobbyist or a business owner, Corel Editor helps you create stunning visuals quickly and efficiently.
