
Starting an online business has never been easier. In fact, thousands of entrepreneurs launch their stores every single day. However, many beginners feel overwhelmed by the technical side of things. Fortunately, you don’t need coding skills to create a professional online store anymore.
Throughout this guide, you’ll learn exactly how to build a website on Shopify from scratch. Moreover, we’ll walk you through every step of the process. By the end, you’ll have all the knowledge needed to launch your store confidently.
Best of all? You can have your website live within 24-48 hours. Additionally, Shopify powers over 4 million businesses worldwide. Therefore, you’re choosing a platform trusted by successful entrepreneurs everywhere.
Let’s dive in and turn your business idea into reality!
Why Choose Shopify for Your Website?
Simply put, Shopify is an all-in-one eCommerce platform that makes it easy to build a website on Shopify without technical skills. It helps you create, manage, and grow your online store effortlessly. Furthermore, it handles everything from hosting to security automatically.
Here’s why beginners love Shopify:
User-Friendly Interface: First and foremost, Shopify offers drag-and-drop functionality. Consequently, you can design your store without touching any code.
Built-In Features: Additionally, you get hosting, SSL security, and payment processing included.Therefore, you don’t need separate services for these essentials.
Mobile-Responsive Themes: Meanwhile, all Shopify themes work perfectly on smartphones. This matters because over 70% of shoppers browse on mobile devices.
Massive App Ecosystem: Moreover, you can access 8,000+ apps for extra functionality. As a result, you can add any feature you need later.
24/7 Customer Support: Plus, Shopify’s support team is always available. Thus, you’ll never feel stuck during the setup process.
Perfect for Beginners: Most importantly, you don’t need technical expertise. Instead, you can focus on your products and customers.
Shopify works wonderfully for various business types. For instance, dropshippers, product creators, and service providers all thrive here. Similarly, both new and established businesses benefit from its features. When you build a website on Shopify, you get a platform designed specifically for eCommerce. Therefore, it includes everything you need to sell online right away.
What You Need Before You Build a Website on Shopify?
Before you start, let’s gather a few essentials. Don’t worry the list is short and simple. These basics will help you build a website on Shopify smoothly and without confusion.
A Business Idea: First, decide what you’ll sell. However, you can refine this later as you grow.
Business Name: Next, choose a name for your store. Keep in mind, you can change it anytime.
Email Address: Additionally, you’ll need this to create your account. Use a professional email if possible.
Custom Domain (Optional): Meanwhile, consider registering a domain name. Nevertheless, you can buy one directly through Shopify later.
Product Details (Optional): Furthermore, having photos and descriptions ready speeds things up. Still, you can add these after launching too.
Budget Planning: Finally, understand the costs involved:
- Shopify plans range from $29 to $399 monthly
- Domain names cost around $14 per year
- Premium themes run $150–$400 (one-time payment)
- Apps vary from free to paid monthly subscriptions
Altogether, you can start for less than $50 if you use free themes and apps. Eventually, you might invest more as your business grows, especially when you plan to build a website on Shopify with advanced features.
How to Build a Website on Shopify
Now comes the exciting part! Let’s build your Shopify website together. Follow these steps carefully, and you’ll have your store ready soon.
Step 1: Sign Up for Your Shopify Account
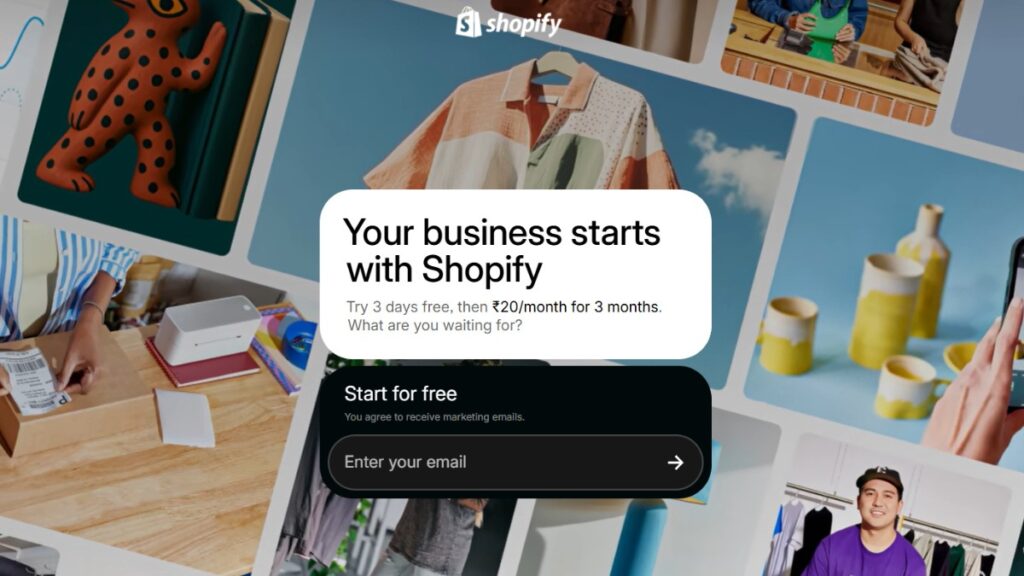
To begin, visit Shopify’s website and click “Start Free Trial.” Currently, Shopify offers a 3-day free trial to explore the platform.
Next, enter your email address and create a strong password. Then, Shopify will ask a few quick questions about your business. Answer honestly; these help personalize your experience.
For example, they’ll ask:
- What you plan to sell
- Whether you’re already selling
- Your business model
After that, you’ll land on your Shopify dashboard. Congratulations! You’ve taken the first step.
Ready to start? Click here to begin your free trial and get started today!
Step 2: Choose Your Shopify Plan
Initially, you’ll use the free trial. However, you’ll need to select a paid plan eventually.
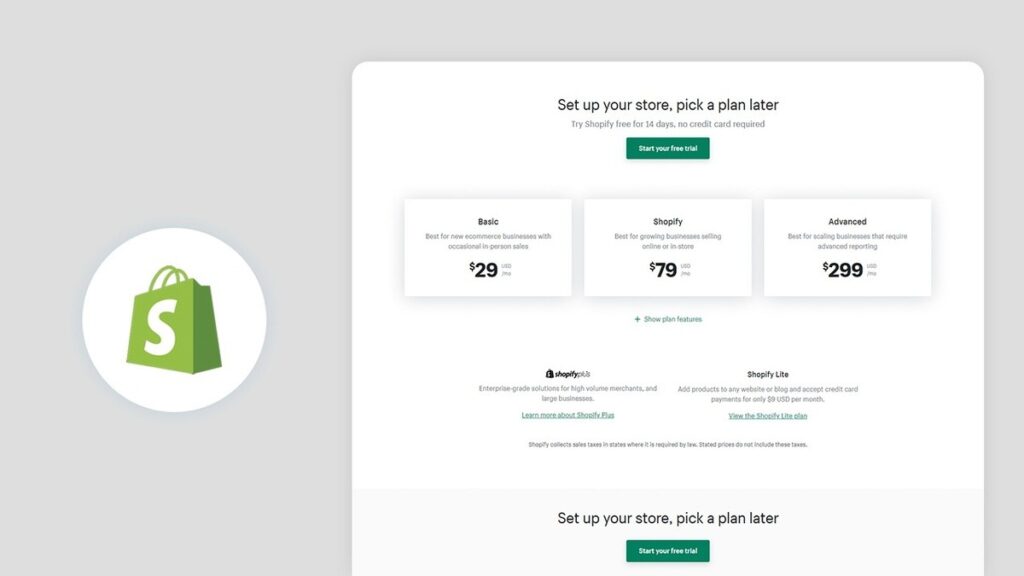
Basic Plan ($29/month): Firstly, this plan suits brand-new stores perfectly. It includes all essential features for beginners. Therefore, most people start here.
Shopify Plan ($79/month): Alternatively, growing businesses prefer this option. It offers better reporting and lower transaction fees. Consequently, you save money as sales increase.
Advanced Plan ($299/month): Meanwhile, established stores with high volume benefit from this tier. It provides advanced analytics and the lowest fees.
For beginners, the Basic plan is absolutely sufficient. Later on, upgrading takes just a few clicks when you’re ready.
Step 3: Set Up Your Store Basics
Now, let’s configure your store’s foundation so you can build a website on Shopify the right way. Navigate to Settings, then click “Store Details.”
Add Your Store Name: First, enter your business name. Remember, this appears on your website and receipts.
Set Business Address: Next, add your location. This information helps calculate taxes and shipping rates correctly.
Choose Currency: Then, select your primary currency. Make sure it matches your target market.
Configure Time Zone: Additionally, set the correct time zone. This affects order timestamps and reports.
Add Contact Information: Finally, include your store email and phone number. Customers need these for support requests.
These details establish your store’s identity and ensure smooth operations from day one, especially when you build a website on Shopify with a strong foundation.
Step 4: Choose and Customize Your Theme
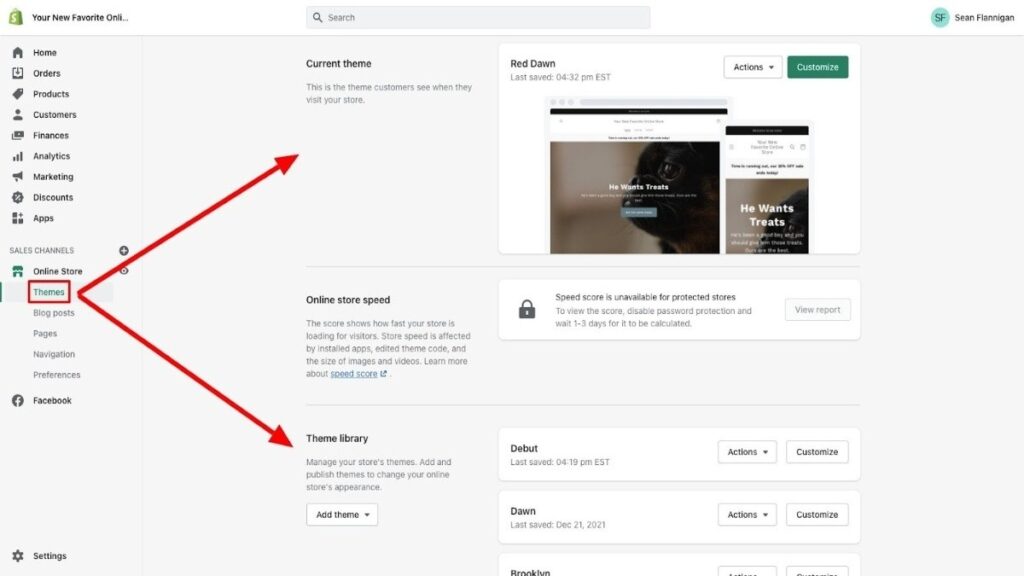
Next up, let’s make your store look amazing! Head to “Online Store” and click “Themes.”
Browse Available Themes: First, explore both free and paid options. Notably, free themes work wonderfully for beginners. Popular choices include Dawn, Refresh, and Sense. Check out more Exciting Free Themes, Apparels Themes, Beauty Products Theme, Jewellery Themes.
Select Your Theme: After browsing, click “Add” on your favorite theme. Then, click “Customize” to enter the editor.
Upload Your Logo: Start by adding your logo at the top. If you don’t have one yet, use your business name instead.
Adjust Colors and Fonts: Next, modify colors to match your brand. Similarly, choose readable fonts that reflect your style.
Customize Homepage Sections: Then, arrange your homepage layout. For instance, add:
- Hero banner with stunning images
- Featured products showcase
- Collection highlights
- Testimonials or trust badges
Add Social Media Links: Additionally, connect your social profiles. This helps customers find you on other platforms.
Preview on All Devices: Finally, check how your site looks on mobile, tablet, and desktop. Click the preview icons to switch between views.
Remember, perfection isn’t the goal initially. Instead, aim for a clean, professional look. You can refine details anytime later.
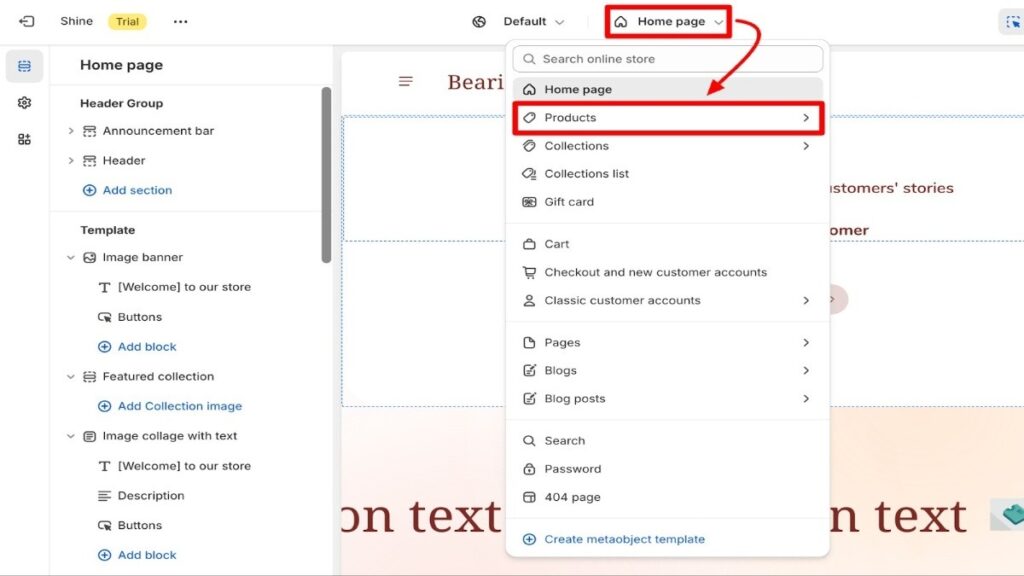
Step 5: Add Your Products
Products are the heart of your store. Therefore, let’s add them properly.
Click “Products” in your dashboard, then select “Add Product.“
Write Product Titles: First, create clear, descriptive titles. Include relevant keywords naturally. For example, “Organic Cotton T-Shirt – Navy Blue.”
Craft Compelling Descriptions: Next, write benefit-focused descriptions. Explain how the product solves problems. Additionally, use bullet points for key features.
Upload High-Quality Images: Then, add multiple photos from different angles. Quality images significantly boost conversions. Moreover, include lifestyle shots showing the product in use.
Set Your Pricing: After that, enter your price and compare-at price. The compare-at price shows the original value, creating urgency.
Configure Variants: Meanwhile, add options like size, color, or material. Each variant can have unique pricing and images.
Track Inventory: Furthermore, enable inventory tracking and set your stock levels. This prevents overselling.
Organize with Tags: Finally, add relevant tags for better organization. Tags help with internal search and filtering.
Pro tip: Use Shopify’s AI description generator if you need inspiration. It creates decent starting points quickly.
Step 6: Create Essential Pages

Every professional store needs certain standard pages. Therefore, let’s create them now.
Go to “Online Store,” then click “Pages.” Next, select “Create Page.”
About Us Page: First, tell your brand story. Explain your mission, values, and what makes you unique. Customers connect with authentic stories.
Contact Page: Next, add a contact form with your email and phone. Quick communication builds trust.
FAQ Page: Then, answer common questions about shipping, returns, and products. This reduces support requests significantly.
Shipping & Returns Policy: Additionally, clearly outline your shipping times and return process. Transparency reduces cart abandonment.
Privacy Policy: Moreover, create a privacy policy using Shopify’s template generator. This protects you legally.
Terms of Service: Finally, add terms of service to cover legal bases. Again, use Shopify’s built-in template.
These pages establish credibility. Furthermore, they answer customer concerns before purchase.
Step 7: Configure Payment Methods

Let’s set up how you’ll receive money. Navigate to Settings, then click “Payments.“
Activate Shopify Payments: First, enable Shopify Payments if available in your region. This is the easiest option. Moreover, you avoid extra transaction fees.
Shopify Payments accepts all major credit cards. Additionally, it processes payments seamlessly during checkout.
Add Alternative Gateways: Alternatively, enable PayPal or other options. Many customers prefer PayPal for security. Therefore, offering multiple methods increases conversions.
Understand Fee Structure: Meanwhile, note the payment processing fees:
- Basic plan: 2.9% + 30¢ per transaction
- Shopify plan: 2.7% + 30¢ per transaction
- Advanced plan: 2.4% + 30¢ per transaction
Complete Verification: Finally, submit any required verification documents. This unlocks full payment functionality.
Multiple payment options give customers flexibility. As a result, fewer people abandon their carts.
Step 8: Set Up Shipping Rates

Shipping configuration impacts your bottom line significantly. Therefore, set this up carefully.
Go to Settings, then select “Shipping and Delivery.“
Create Shipping Zones: First, define where you’ll ship. For example, create zones for:
- Domestic (your country)
- International regions
- Specific countries
Configure Rate Options: Next, decide your shipping strategy:
Free Shipping: Customers love free shipping. However, factor costs into product prices.
Flat Rate Shipping: Alternatively, charge one price regardless of order size. This simplifies calculations.
Calculated Shipping: Meanwhile, real-time carrier rates show exact costs. This is most accurate but slightly complex.
Local Options: Additionally, enable local pickup or delivery if applicable. This saves customers shipping fees.
Set Minimum Orders: Furthermore, consider free shipping thresholds. For instance, “Free shipping over $50” encourages larger orders.
Clear shipping information reduces surprises. Consequently, customers complete purchases more confidently.
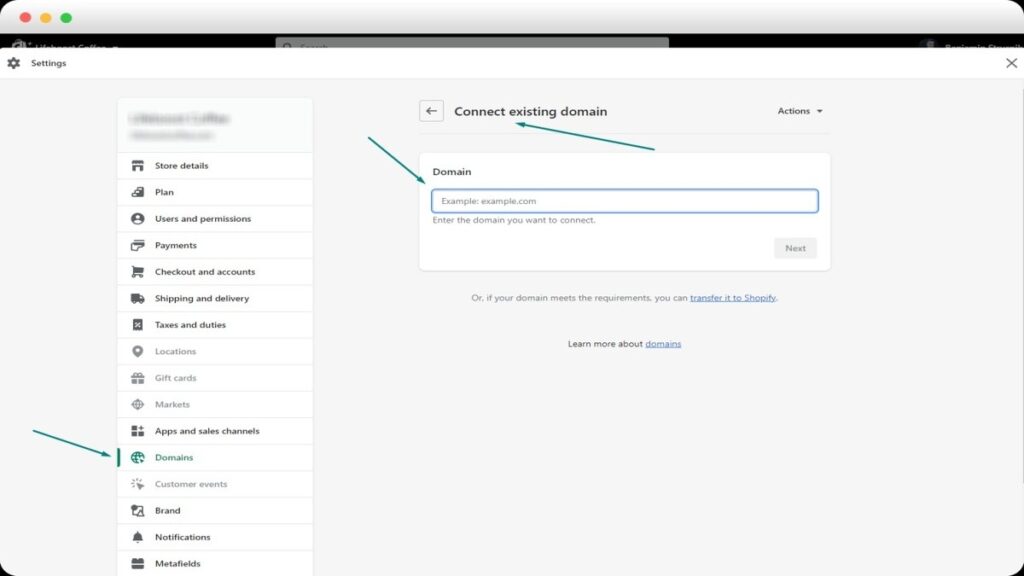
Step 9: Connect Your Custom Domain
A custom domain makes your store look professional. Therefore, let’s set this up next.
Navigate to Settings, then click “Domains.”
Option 1 – Buy Through Shopify: First, consider purchasing directly from Shopify. Domains cost around $14 yearly. Moreover, setup happens automatically.
Option 2 – Connect Existing Domain: Alternatively, use a domain you already own. You’ll need to:
- Access your domain registrar
- Update DNS settings
- Point to Shopify’s servers
- Follow Shopify’s connection guide
Set as Primary: After connecting, set it as your primary domain. All traffic will use this address now.
SSL Certificate: Finally, note that Shopify applies SSL automatically. Therefore, your site shows “https://” and that padlock icon.
Your custom domain builds trust immediately. Furthermore, it makes marketing efforts more effective.
Step 10: Test Your Store Thoroughly
Before launching, test everything carefully to avoid embarrassing mistakes. This step is crucial when you build a website on Shopify and want a flawless customer experience.
Place Test Orders: First, use Shopify’s Bogus Gateway to simulate purchases and complete the entire checkout process.
Check Mobile Experience: Next, browse your store on your smartphone and test every page and button.
Verify All Links: Then, click every menu item and button to ensure nothing leads to an error
page.
Test Contact Forms: Additionally, submit a test message through your contact forms and confirm you receive the email.
Review Email Notifications: Meanwhile, check that order confirmation emails look professional since they represent your brand.
Get Outside Feedback: Finally, ask friends or family to browse your store fresh eyes catch issues you may overlook.
Testing helps you fix problems before customers encounter them, allowing you to launch confidently when you build a website on Shopify.
Step 11: Launch Your Shopify Store
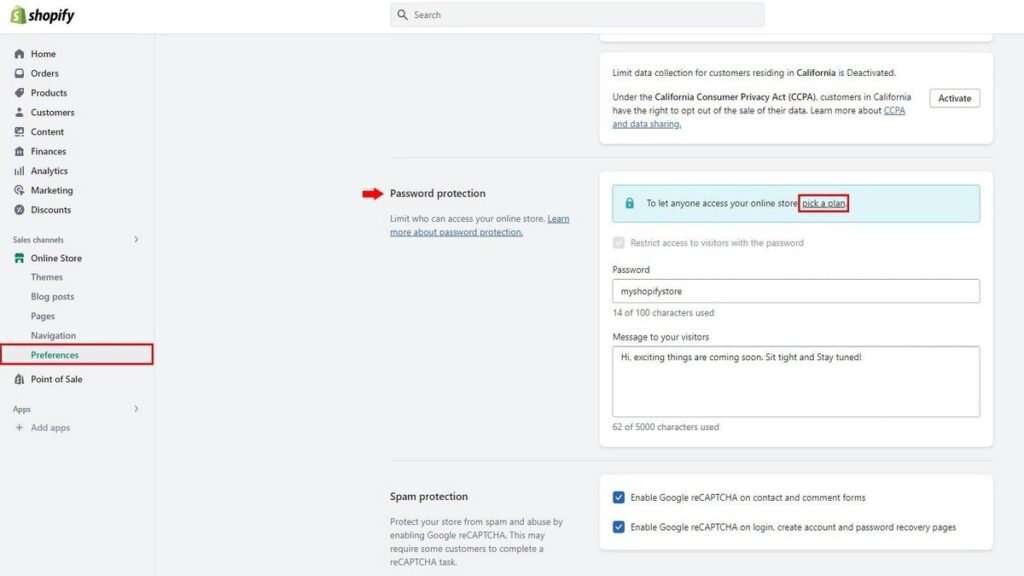
The moment has arrived! Let’s remove that password and go live.
Navigate to “Online Store,” then click “Preferences.” Scroll down and uncheck “Password Protection.“
Review Launch Checklist: First, go through Shopify’s built-in launch checklist. It ensures you’ve completed all critical steps.
Double-Check Settings: Next, verify payment, shipping, and product details one final time. Better safe than sorry!
Announce Your Launch: Then, share the news on social media. Post on Instagram, Facebook, and other platforms.
Email Your Network: Additionally, send announcements to friends, family, and email subscribers. Early support builds momentum.
Celebrate Your Achievement: Finally, take a moment to appreciate what you’ve built. You’ve successfully created a professional online store!
Haven’t started yet? Click here to build your Shopify store now with our step-by-step guide!
Common Mistakes to Avoid When You Build a Website on Shopify
Learning from others’ mistakes saves time and money. Therefore, watch out for these common pitfalls when you build a website on Shopify:
- Poor Product Photos: Never use blurry images, quality photos directly boost sales.
- Weak Descriptions: Don’t just list features; highlight benefits and customer solutions.
- Complicated Navigation: Keep menus simple and intuitive.
- Hidden Shipping Costs: Avoid surprise fees at checkout; show costs upfront.
- Missing Trust Signals: Add reviews, policies, and contact details early.
- Ignoring Mobile Users: Always test your store on smartphones.
- Neglecting SEO: Add keywords naturally across your site.
- Too Many Apps: Unnecessary apps slow your store down.
- Skipping Tests: Never launch without checking all features.
- No Marketing Plan: Don’t launch and wait to plan how you’ll attract traffic.
By avoiding these mistakes, you’ll grow faster and far more profitably.
How Much Does It Cost to Build a Website on Shopify?
Understanding costs helps you budget properly. Let’s break down what you’ll actually spend.
Shopify Subscription: First, plans range from $29 to $399 monthly. Most beginners start at $29. Therefore, budget this as your base cost.
Domain Name: Next, custom domains cost around $14 annually through Shopify. Alternatively, buy from other registrars for similar prices.
Theme Costs: Then, decide between free or paid themes. Free themes work great initially. However, premium themes ($150-400) offer more customization.
App Subscriptions: Additionally, most essential apps offer free plans. Paid apps typically cost $5-50 monthly each. Start free, upgrade when needed.
Photography: Moreover, product photos matter enormously. DIY with a smartphone or hire a photographer ($50-500).
Marketing Budget: Finally, allocate funds for advertising. Start with $100-300 monthly for testing.
Total Estimated Startup Cost: All together, expect $50-200 for the first month. Then, ongoing costs run $30-150 monthly depending on your choices.
Most stores recover these investments within 60-90 days. Therefore, the potential return far exceeds the initial cost.
Conclusion
Congratulations! You now know exactly how to build a website on Shopify. Moreover, you understand every step from signup to launch.Building a Shopify store is simpler than most people think. In fact, you can have everything ready within 24-48 hours. Furthermore, you don’t need coding skills or technical expertise.The key is taking action today. Don’t wait for perfect products or the ideal design. Instead, launch your store and improve as you grow.
Remember, every successful Shopify merchant started exactly where you are now. They felt nervous, uncertain, and overwhelmed initially. However, they took that first step anyway.Your future customers are waiting for what you offer. Therefore, stop planning and start building. The best time to launch was yesterday. The second-best time is right now.Shopify powers millions of successful businesses worldwide. It provides everything you need to succeed. Moreover, you have this complete guide to reference anytime.
Ready to turn your business idea into reality? Start your free Shopify trial today and build your store in just a few hours. No credit card required to start!
